> ## Documentation Index
> Fetch the complete documentation index at: https://wb-21fd5541-feat-cli-docs-generator.mintlify.site/llms.txt
> Use this file to discover all available pages before exploring further.
# Deploy W&B Platform on AWS
> AWS에 W&B 서버 호스팅하기.
Weights & Biases는 [W\&B Multi-tenant Cloud](/ko/platform/hosting/hosting-options/multi_tenant_cloud) 또는 [W\&B 전용 클라우드](/ko/platform/hosting/hosting-options/dedicated_cloud/) 배포 유형과 같은 완전 관리형 배포 옵션을 권장합니다. W\&B 완전 관리형 서비스는 사용하기 간단하고 안전하며, 필요한 설정이 최소화되거나 전혀 없습니다.
W\&B는 AWS에 플랫폼을 배포하기 위해 [W\&B Server AWS Terraform Module](https://registry.terraform.io/modules/wandb/wandb/aws/latest) 사용을 권장합니다.
시작하기 전에, W\&B는 Terraform에서 사용 가능한 [원격 백엔드](https://developer.hashicorp.com/terraform/language/backend) 중 하나를 선택하여 [상태 파일](https://developer.hashicorp.com/terraform/language/state)을 저장하는 것을 권장합니다.
상태 파일은 모든 구성 요소를 다시 만들지 않고도 업그레이드를 롤아웃하거나 배포를 변경하는 데 필요한 리소스입니다.
Terraform Module은 다음의 `필수` 구성 요소를 배포합니다.
* 로드 밸런서
* AWS Identity & Access Management (IAM)
* AWS Key Management System (KMS)
* Amazon Aurora MySQL
* Amazon VPC
* Amazon S3
* Amazon Route53
* Amazon Certificate Manager (ACM)
* Amazon Elastic Load Balancing (ALB)
* Amazon Secrets Manager
다른 배포 옵션은 다음의 선택적 구성 요소를 포함할 수도 있습니다.
* Redis용 Elastic Cache
* SQS
## 사전 필수 권한
Terraform을 실행하는 계정은 도입에서 설명된 모든 구성 요소를 생성할 수 있는 권한과 **IAM 정책** 및 **IAM 역할**을 생성하고 역할에 리소스를 할당할 수 있는 권한이 필요합니다.
## 일반적인 단계
이 주제의 단계는 이 문서에서 다루는 모든 배포 옵션에 공통적입니다.
1. 개발 환경을 준비합니다.
* [Terraform](https://developer.hashicorp.com/terraform/tutorials/aws-get-started/install-cli) 설치
* W\&B는 버전 관리를 위해 Git 저장소를 만드는 것을 권장합니다.
2. `terraform.tfvars` 파일을 만듭니다.
`tvfars` 파일 내용은 설치 유형에 따라 사용자 정의할 수 있지만, 최소 권장 사항은 아래 예제와 같습니다.
```bash theme={null}
namespace = "wandb"
license = "xxxxxxxxxxyyyyyyyyyyyzzzzzzz"
subdomain = "wandb-aws"
domain_name = "wandb.ml"
zone_id = "xxxxxxxxxxxxxxxx"
allowed_inbound_cidr = ["0.0.0.0/0"]
allowed_inbound_ipv6_cidr = ["::/0"]
eks_cluster_version = "1.29"
```
`namespace` 변수는 Terraform이 생성한 모든 리소스의 접두사로 사용되는 문자열이므로 배포하기 전에 `tvfars` 파일에 변수를 정의해야 합니다.
`subdomain`과 `domain`의 조합은 W\&B가 구성될 FQDN을 형성합니다. 위의 예에서 W\&B FQDN은 `wandb-aws.wandb.ml`이 되고, FQDN 레코드가 생성될 DNS `zone_id`가 됩니다.
`allowed_inbound_cidr` 및 `allowed_inbound_ipv6_cidr`도 설정해야 합니다. 모듈에서 이는 필수 입력입니다. 이전 예제는 모든 소스에서 W\&B 설치에 대한 엑세스를 허용합니다.
3. `versions.tf` 파일을 만듭니다.
이 파일에는 AWS에 W\&B를 배포하는 데 필요한 Terraform 및 Terraform provider 버전이 포함됩니다.
```bash theme={null}
provider "aws" {
region = "eu-central-1"
default_tags {
tags = {
GithubRepo = "terraform-aws-wandb"
GithubOrg = "wandb"
Enviroment = "Example"
Example = "PublicDnsExternal"
}
}
}
```
AWS provider를 구성하려면 [Terraform 공식 문서](https://registry.terraform.io/providers/hashicorp/aws/latest/docs#provider-configuration)를 참조하세요.
선택 사항이지만, 이 문서의 시작 부분에서 언급한 [원격 백엔드 설정](https://developer.hashicorp.com/terraform/language/backend)을 추가하는 것이 좋습니다.
4. `variables.tf` 파일을 만듭니다.
`terraform.tfvars`에 구성된 모든 옵션에 대해 Terraform은 해당 변수 선언이 필요합니다.
```
variable "namespace" {
type = string
description = "리소스에 사용되는 이름 접두사"
}
variable "domain_name" {
type = string
description = "인스턴스에 엑세스하는 데 사용되는 도메인 이름입니다."
}
variable "subdomain" {
type = string
default = null
description = "Weights & Biases UI에 엑세스하기 위한 서브 도메인입니다."
}
variable "license" {
type = string
}
variable "zone_id" {
type = string
description = "Weights & Biases 서브 도메인을 생성할 도메인입니다."
}
variable "allowed_inbound_cidr" {
description = "wandb-server에 엑세스할 수 있는 CIDR입니다."
nullable = false
type = list(string)
}
variable "allowed_inbound_ipv6_cidr" {
description = "wandb-server에 엑세스할 수 있는 CIDR입니다."
nullable = false
type = list(string)
}
variable "eks_cluster_version" {
description = "EKS 클러스터 Kubernetes 버전"
nullable = false
type = string
}
```
## 권장 배포 옵션
이것은 모든 `필수` 구성 요소를 생성하고 `Kubernetes Cluster`에 최신 버전의 `W&B`를 설치하는 가장 간단한 배포 옵션 구성입니다.
1. `main.tf`를 만듭니다.
`일반적인 단계`에서 파일을 생성한 동일한 디렉터리에 다음 내용으로 `main.tf` 파일을 만듭니다.
```
module "wandb_infra" {
source = "wandb/wandb/aws"
version = "~>7.0"
namespace = var.namespace
domain_name = var.domain_name
subdomain = var.subdomain
zone_id = var.zone_id
allowed_inbound_cidr = var.allowed_inbound_cidr
allowed_inbound_ipv6_cidr = var.allowed_inbound_ipv6_cidr
public_access = true
external_dns = true
kubernetes_public_access = true
kubernetes_public_access_cidrs = ["0.0.0.0/0"]
eks_cluster_version = var.eks_cluster_version
}
data "aws_eks_cluster" "eks_cluster_id" {
name = module.wandb_infra.cluster_name
}
data "aws_eks_cluster_auth" "eks_cluster_auth" {
name = module.wandb_infra.cluster_name
}
provider "kubernetes" {
host = data.aws_eks_cluster.eks_cluster_id.endpoint
cluster_ca_certificate = base64decode(data.aws_eks_cluster.eks_cluster_id.certificate_authority.0.data)
token = data.aws_eks_cluster_auth.eks_cluster_auth.token
}
provider "helm" {
kubernetes {
host = data.aws_eks_cluster.eks_cluster_id.endpoint
cluster_ca_certificate = base64decode(data.aws_eks_cluster.eks_cluster_id.certificate_authority.0.data)
token = data.aws_eks_cluster_auth.eks_cluster_auth.token
}
}
output "url" {
value = module.wandb_infra.url
}
output "bucket" {
value = module.wandb_infra.bucket_name
}
```
2. W\&B 배포
W\&B를 배포하려면 다음 코맨드를 실행합니다.
```
terraform init
terraform apply -var-file=terraform.tfvars
```
## REDIS 활성화
다른 배포 옵션은 `Redis`를 사용하여 SQL 쿼리를 캐시하고 Experiments에 대한 메트릭을 로드할 때 애플리케이션 응답 속도를 높입니다.
캐시를 활성화하려면 [권장 배포](#recommended-deployment-option) 섹션에 설명된 동일한 `main.tf` 파일에 `create_elasticache_subnet = true` 옵션을 추가해야 합니다.
```
module "wandb_infra" {
source = "wandb/wandb/aws"
version = "~>7.0"
namespace = var.namespace
domain_name = var.domain_name
subdomain = var.subdomain
zone_id = var.zone_id
**create_elasticache_subnet = true**
}
[...]
```
## 메시지 브로커(대기열) 활성화
배포 옵션 3은 외부 `message broker`를 활성화하는 것으로 구성됩니다. W\&B가 내장된 브로커를 제공하므로 이는 선택 사항입니다. 이 옵션은 성능 향상을 제공하지 않습니다.
메시지 브로커를 제공하는 AWS 리소스는 `SQS`이며, 이를 활성화하려면 [권장 배포](#recommended-deployment-option) 섹션에 설명된 동일한 `main.tf`에 `use_internal_queue = false` 옵션을 추가해야 합니다.
```
module "wandb_infra" {
source = "wandb/wandb/aws"
version = "~>7.0"
namespace = var.namespace
domain_name = var.domain_name
subdomain = var.subdomain
zone_id = var.zone_id
**use_internal_queue = false**
[...]
}
```
## 기타 배포 옵션
동일한 파일에 모든 구성을 추가하여 세 가지 배포 옵션을 모두 결합할 수 있습니다.
[Terraform Module](https://github.com/wandb/terraform-aws-wandb)은 표준 옵션과 `배포 - 권장`에서 찾을 수 있는 최소 구성과 함께 결합할 수 있는 여러 옵션을 제공합니다.
## 수동 구성
Amazon S3 버킷을 W\&B의 파일 스토리지 백엔드로 사용하려면 다음을 수행해야 합니다.
* [Amazon S3 버킷 및 버킷 알림 생성](#create-an-s3-bucket-and-bucket-notifications)
* [SQS 대기열 생성](#create-an-sqs-queue)
* [W\&B를 실행하는 노드에 권한 부여](#grant-permissions-to-node-that-runs-wb)
버킷에서 오브젝트 생성 알림을 수신하도록 구성된 SQS 대기열과 함께 버킷을 만들어야 합니다. 인스턴스에는 이 대기열에서 읽을 수 있는 권한이 필요합니다.
### S3 버킷 및 버킷 알림 생성
아래 절차에 따라 Amazon S3 버킷을 만들고 버킷 알림을 활성화합니다.
1. AWS 콘솔에서 Amazon S3로 이동합니다.
2. **버킷 만들기**를 선택합니다.
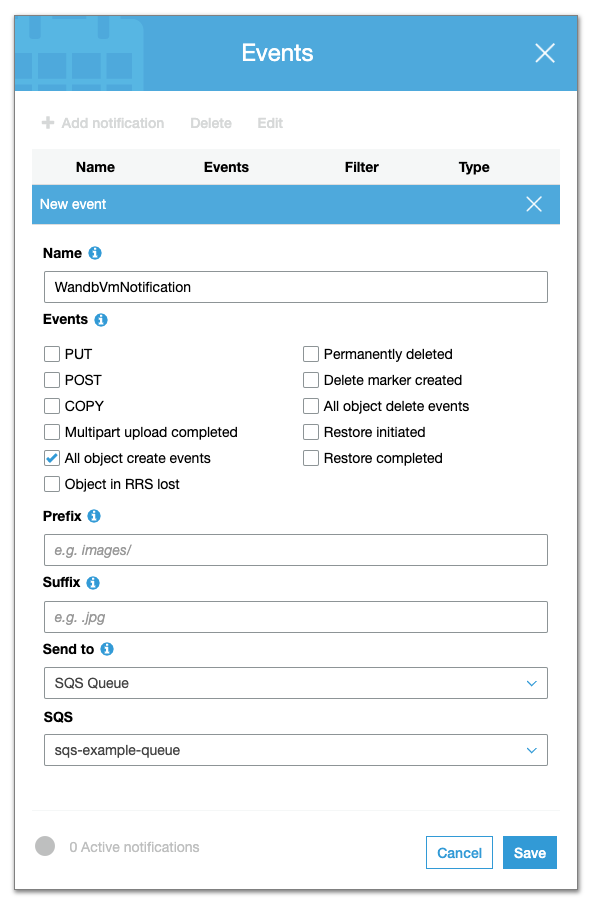
3. **고급 설정** 내에서 **이벤트** 섹션 내에서 **알림 추가**를 선택합니다.
4. 이전에 구성한 SQS 대기열로 전송되도록 모든 오브젝트 생성 이벤트를 구성합니다.
 CORS 엑세스를 활성화합니다. CORS 구성은 다음과 같아야 합니다.
```markup theme={null}
http://YOUR-W&B-SERVER-IP
GET
PUT
*
```
### SQS 대기열 생성
SQS 대기열을 만들려면 아래 절차를 따르세요.
1. AWS 콘솔에서 Amazon SQS로 이동합니다.
2. **대기열 만들기**를 선택합니다.
3. **세부 정보** 섹션에서 **표준** 대기열 유형을 선택합니다.
4. 엑세스 정책 섹션에서 다음 보안 주체에 대한 권한을 추가합니다.
* `SendMessage`
* `ReceiveMessage`
* `ChangeMessageVisibility`
* `DeleteMessage`
* `GetQueueUrl`
선택적으로 **엑세스 정책** 섹션에서 고급 엑세스 정책을 추가합니다. 예를 들어, 명령문이 있는 Amazon SQS에 엑세스하기 위한 정책은 다음과 같습니다.
```json theme={null}
{
"Version" : "2012-10-17",
"Statement" : [
{
"Effect" : "Allow",
"Principal" : "*",
"Action" : ["sqs:SendMessage"],
"Resource" : "",
"Condition" : {
"ArnEquals" : { "aws:SourceArn" : "" }
}
}
]
}
```
### W\&B를 실행하는 노드에 권한 부여
W\&B 서버가 실행 중인 노드는 Amazon S3 및 Amazon SQS에 대한 엑세스를 허용하도록 구성해야 합니다. 선택한 서버 배포 유형에 따라 다음 정책 명령문을 노드 역할에 추가해야 할 수 있습니다.
```json theme={null}
{
"Statement":[
{
"Sid":"",
"Effect":"Allow",
"Action":"s3:*",
"Resource":"arn:aws:s3:::"
},
{
"Sid":"",
"Effect":"Allow",
"Action":[
"sqs:*"
],
"Resource":"arn:aws:sqs:::"
}
]
}
```
### W\&B 서버 구성
마지막으로 W\&B 서버를 구성합니다.
1. `http(s)://YOUR-W&B-SERVER-HOST/system-admin`에서 W\&B 설정 페이지로 이동합니다.
2. \*\**외부 파일 스토리지 백엔드 사용* 옵션을 활성화합니다.
3. 다음 형식으로 Amazon S3 버킷, 리전 및 Amazon SQS 대기열에 대한 정보를 제공합니다.
* **파일 스토리지 버킷**: `s3://<버킷 이름>`
* **파일 스토리지 리전(AWS 전용)**: `<리전>`
* **알림 구독**: `sqs://<대기열 이름>`
CORS 엑세스를 활성화합니다. CORS 구성은 다음과 같아야 합니다.
```markup theme={null}
http://YOUR-W&B-SERVER-IP
GET
PUT
*
```
### SQS 대기열 생성
SQS 대기열을 만들려면 아래 절차를 따르세요.
1. AWS 콘솔에서 Amazon SQS로 이동합니다.
2. **대기열 만들기**를 선택합니다.
3. **세부 정보** 섹션에서 **표준** 대기열 유형을 선택합니다.
4. 엑세스 정책 섹션에서 다음 보안 주체에 대한 권한을 추가합니다.
* `SendMessage`
* `ReceiveMessage`
* `ChangeMessageVisibility`
* `DeleteMessage`
* `GetQueueUrl`
선택적으로 **엑세스 정책** 섹션에서 고급 엑세스 정책을 추가합니다. 예를 들어, 명령문이 있는 Amazon SQS에 엑세스하기 위한 정책은 다음과 같습니다.
```json theme={null}
{
"Version" : "2012-10-17",
"Statement" : [
{
"Effect" : "Allow",
"Principal" : "*",
"Action" : ["sqs:SendMessage"],
"Resource" : "",
"Condition" : {
"ArnEquals" : { "aws:SourceArn" : "" }
}
}
]
}
```
### W\&B를 실행하는 노드에 권한 부여
W\&B 서버가 실행 중인 노드는 Amazon S3 및 Amazon SQS에 대한 엑세스를 허용하도록 구성해야 합니다. 선택한 서버 배포 유형에 따라 다음 정책 명령문을 노드 역할에 추가해야 할 수 있습니다.
```json theme={null}
{
"Statement":[
{
"Sid":"",
"Effect":"Allow",
"Action":"s3:*",
"Resource":"arn:aws:s3:::"
},
{
"Sid":"",
"Effect":"Allow",
"Action":[
"sqs:*"
],
"Resource":"arn:aws:sqs:::"
}
]
}
```
### W\&B 서버 구성
마지막으로 W\&B 서버를 구성합니다.
1. `http(s)://YOUR-W&B-SERVER-HOST/system-admin`에서 W\&B 설정 페이지로 이동합니다.
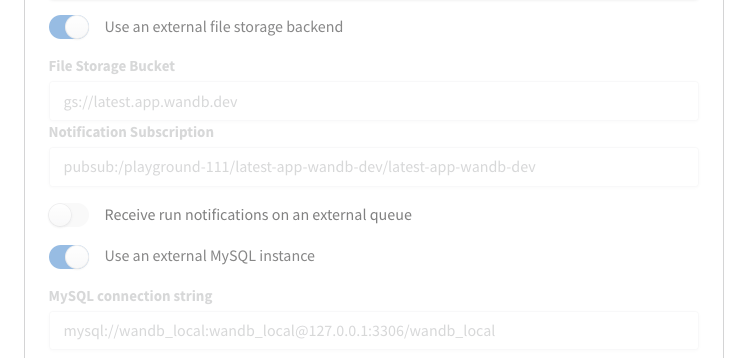
2. \*\**외부 파일 스토리지 백엔드 사용* 옵션을 활성화합니다.
3. 다음 형식으로 Amazon S3 버킷, 리전 및 Amazon SQS 대기열에 대한 정보를 제공합니다.
* **파일 스토리지 버킷**: `s3://<버킷 이름>`
* **파일 스토리지 리전(AWS 전용)**: `<리전>`
* **알림 구독**: `sqs://<대기열 이름>`
 4. **설정 업데이트**를 선택하여 새 설정을 적용합니다.
## W\&B 버전 업그레이드
다음 단계에 따라 W\&B를 업데이트합니다.
1. `wandb_app` 모듈의 구성에 `wandb_version`을 추가합니다. 업그레이드할 W\&B 버전을 제공합니다. 예를 들어, 다음 줄은 W\&B 버전 `0.48.1`을 지정합니다.
```
module "wandb_app" {
source = "wandb/wandb/kubernetes"
version = "~>1.0"
license = var.license
wandb_version = "0.48.1"
```
또는 `wandb_version`을 `terraform.tfvars`에 추가하고 동일한 이름으로 변수를 만들고 리터럴 값을 사용하는 대신 `var.wandb_version`을 사용할 수 있습니다.
2. 구성을 업데이트한 후 [권장 배포 섹션](#recommended-deployment-option)에 설명된 단계를 완료합니다.
## 운영자 기반 AWS Terraform 모듈로 마이그레이션
이 섹션에서는 [terraform-aws-wandb](https://registry.terraform.io/modules/wandb/wandb/aws/latest) 모듈을 사용하여 *pre-operator* 환경에서 *post-operator* 환경으로 업그레이드하는 데 필요한 단계를 자세히 설명합니다.
Kubernetes [operator](https://kubernetes.io/docs/concepts/extend-kubernetes/operator/) 패턴으로의 전환은 W\&B 아키텍처에 필요합니다. 아키텍처 변경에 대한 자세한 설명은 [이 섹션](/ko/platform/hosting/operator/#reasons-for-the-architecture-shift)을 참조하세요.
### 이전 및 이후 아키텍처
이전에는 W\&B 아키텍처에서 다음을 사용했습니다.
```hcl theme={null}
module "wandb_infra" {
source = "wandb/wandb/aws"
version = "1.16.10"
...
}
```
인프라를 제어합니다.
4. **설정 업데이트**를 선택하여 새 설정을 적용합니다.
## W\&B 버전 업그레이드
다음 단계에 따라 W\&B를 업데이트합니다.
1. `wandb_app` 모듈의 구성에 `wandb_version`을 추가합니다. 업그레이드할 W\&B 버전을 제공합니다. 예를 들어, 다음 줄은 W\&B 버전 `0.48.1`을 지정합니다.
```
module "wandb_app" {
source = "wandb/wandb/kubernetes"
version = "~>1.0"
license = var.license
wandb_version = "0.48.1"
```
또는 `wandb_version`을 `terraform.tfvars`에 추가하고 동일한 이름으로 변수를 만들고 리터럴 값을 사용하는 대신 `var.wandb_version`을 사용할 수 있습니다.
2. 구성을 업데이트한 후 [권장 배포 섹션](#recommended-deployment-option)에 설명된 단계를 완료합니다.
## 운영자 기반 AWS Terraform 모듈로 마이그레이션
이 섹션에서는 [terraform-aws-wandb](https://registry.terraform.io/modules/wandb/wandb/aws/latest) 모듈을 사용하여 *pre-operator* 환경에서 *post-operator* 환경으로 업그레이드하는 데 필요한 단계를 자세히 설명합니다.
Kubernetes [operator](https://kubernetes.io/docs/concepts/extend-kubernetes/operator/) 패턴으로의 전환은 W\&B 아키텍처에 필요합니다. 아키텍처 변경에 대한 자세한 설명은 [이 섹션](/ko/platform/hosting/operator/#reasons-for-the-architecture-shift)을 참조하세요.
### 이전 및 이후 아키텍처
이전에는 W\&B 아키텍처에서 다음을 사용했습니다.
```hcl theme={null}
module "wandb_infra" {
source = "wandb/wandb/aws"
version = "1.16.10"
...
}
```
인프라를 제어합니다.
 그리고 이 모듈을 사용하여 W\&B 서버를 배포합니다.
```hcl theme={null}
module "wandb_app" {
source = "wandb/wandb/kubernetes"
version = "1.12.0"
}
```
그리고 이 모듈을 사용하여 W\&B 서버를 배포합니다.
```hcl theme={null}
module "wandb_app" {
source = "wandb/wandb/kubernetes"
version = "1.12.0"
}
```
 전환 후 아키텍처는 다음을 사용합니다.
```hcl theme={null}
module "wandb_infra" {
source = "wandb/wandb/aws"
version = "4.7.2"
...
}
```
인프라 설치와 Kubernetes 클러스터에 대한 W\&B 서버를 모두 관리하므로 `post-operator.tf`에서 `module "wandb_app"`이 필요하지 않습니다.
전환 후 아키텍처는 다음을 사용합니다.
```hcl theme={null}
module "wandb_infra" {
source = "wandb/wandb/aws"
version = "4.7.2"
...
}
```
인프라 설치와 Kubernetes 클러스터에 대한 W\&B 서버를 모두 관리하므로 `post-operator.tf`에서 `module "wandb_app"`이 필요하지 않습니다.
 이러한 아키텍처 변경을 통해 SRE/인프라 팀의 수동 Terraform 작업 없이도 추가 기능(예: OpenTelemetry, Prometheus, HPA, Kafka 및 이미지 업데이트)을 사용할 수 있습니다.
W\&B Pre-Operator의 기본 설치를 시작하려면 `post-operator.tf`에 `.disabled` 파일 확장명이 있고 `pre-operator.tf`가 활성 상태인지(확장명이 `.disabled`가 아닌지) 확인합니다. 해당 파일은 [여기](https://github.com/wandb/terraform-aws-wandb/tree/main/docs/operator-migration)에서 찾을 수 있습니다.
### 전제 조건
마이그레이션 프로세스를 시작하기 전에 다음 전제 조건이 충족되었는지 확인합니다.
* **Egress**: 배포가 에어 갭이 될 수 없습니다. ***Release Channel***에 대한 최신 사양을 가져오려면 [deploy.wandb.ai](https://deploy.wandb.ai)에 엑세스해야 합니다.
* **AWS 자격 증명**: AWS 리소스와 상호 작용하도록 구성된 적절한 AWS 자격 증명.
* **Terraform 설치됨**: 시스템에 최신 버전의 Terraform이 설치되어 있어야 합니다.
* **Route53 호스팅 영역**: 애플리케이션이 제공될 도메인에 해당하는 기존 Route53 호스팅 영역.
* **Pre-Operator Terraform 파일**: `pre-operator.tf` 및 `pre-operator.tfvars`와 같은 관련 변수 파일이 올바르게 설정되었는지 확인합니다.
### Pre-Operator 설정
다음 Terraform 코맨드를 실행하여 Pre-Operator 설정에 대한 구성을 초기화하고 적용합니다.
```bash theme={null}
terraform init -upgrade
terraform apply -var-file=./pre-operator.tfvars
```
`pre-operator.tf`는 다음과 유사해야 합니다.
```ini theme={null}
namespace = "operator-upgrade"
domain_name = "sandbox-aws.wandb.ml"
zone_id = "Z032246913CW32RVRY0WU"
subdomain = "operator-upgrade"
wandb_license = "ey..."
wandb_version = "0.51.2"
```
`pre-operator.tf` 구성은 두 개의 모듈을 호출합니다.
```hcl theme={null}
module "wandb_infra" {
source = "wandb/wandb/aws"
version = "1.16.10"
...
}
```
이 모듈은 인프라를 가동합니다.
```hcl theme={null}
module "wandb_app" {
source = "wandb/wandb/kubernetes"
version = "1.12.0"
}
```
이 모듈은 애플리케이션을 배포합니다.
### Post-Operator 설정
`pre-operator.tf`에 `.disabled` 확장명이 있고 `post-operator.tf`가 활성 상태인지 확인합니다.
`post-operator.tfvars`에는 추가 변수가 포함되어 있습니다.
```ini theme={null}
...
# wandb_version = "0.51.2"는 이제 릴리스 채널을 통해 관리되거나 사용자 사양에 설정됩니다.
# 업그레이드에 필요한 운영자 변수:
size = "small"
enable_dummy_dns = true
enable_operator_alb = true
custom_domain_filter = "sandbox-aws.wandb.ml"
```
다음 코맨드를 실행하여 Post-Operator 구성을 초기화하고 적용합니다.
```bash theme={null}
terraform init -upgrade
terraform apply -var-file=./post-operator.tfvars
```
계획 및 적용 단계에서는 다음 리소스를 업데이트합니다.
```yaml theme={null}
actions:
create:
- aws_efs_backup_policy.storage_class
- aws_efs_file_system.storage_class
- aws_efs_mount_target.storage_class["0"]
- aws_efs_mount_target.storage_class["1"]
- aws_eks_addon.efs
- aws_iam_openid_connect_provider.eks
- aws_iam_policy.secrets_manager
- aws_iam_role_policy_attachment.ebs_csi
- aws_iam_role_policy_attachment.eks_efs
- aws_iam_role_policy_attachment.node_secrets_manager
- aws_security_group.storage_class_nfs
- aws_security_group_rule.nfs_ingress
- random_pet.efs
- aws_s3_bucket_acl.file_storage
- aws_s3_bucket_cors_configuration.file_storage
- aws_s3_bucket_ownership_controls.file_storage
- aws_s3_bucket_server_side_encryption_configuration.file_storage
- helm_release.operator
- helm_release.wandb
- aws_cloudwatch_log_group.this[0]
- aws_iam_policy.default
- aws_iam_role.default
- aws_iam_role_policy_attachment.default
- helm_release.external_dns
- aws_default_network_acl.this[0]
- aws_default_route_table.default[0]
- aws_iam_policy.default
- aws_iam_role.default
- aws_iam_role_policy_attachment.default
- helm_release.aws_load_balancer_controller
update_in_place:
- aws_iam_policy.node_IMDSv2
- aws_iam_policy.node_cloudwatch
- aws_iam_policy.node_kms
- aws_iam_policy.node_s3
- aws_iam_policy.node_sqs
- aws_eks_cluster.this[0]
- aws_elasticache_replication_group.default
- aws_rds_cluster.this[0]
- aws_rds_cluster_instance.this["1"]
- aws_default_security_group.this[0]
- aws_subnet.private[0]
- aws_subnet.private[1]
- aws_subnet.public[0]
- aws_subnet.public[1]
- aws_launch_template.workers["primary"]
destroy:
- kubernetes_config_map.config_map
- kubernetes_deployment.wandb
- kubernetes_priority_class.priority
- kubernetes_secret.secret
- kubernetes_service.prometheus
- kubernetes_service.service
- random_id.snapshot_identifier[0]
replace:
- aws_autoscaling_attachment.autoscaling_attachment["primary"]
- aws_route53_record.alb
- aws_eks_node_group.workers["primary"]
```
다음과 같은 내용이 표시됩니다.
이러한 아키텍처 변경을 통해 SRE/인프라 팀의 수동 Terraform 작업 없이도 추가 기능(예: OpenTelemetry, Prometheus, HPA, Kafka 및 이미지 업데이트)을 사용할 수 있습니다.
W\&B Pre-Operator의 기본 설치를 시작하려면 `post-operator.tf`에 `.disabled` 파일 확장명이 있고 `pre-operator.tf`가 활성 상태인지(확장명이 `.disabled`가 아닌지) 확인합니다. 해당 파일은 [여기](https://github.com/wandb/terraform-aws-wandb/tree/main/docs/operator-migration)에서 찾을 수 있습니다.
### 전제 조건
마이그레이션 프로세스를 시작하기 전에 다음 전제 조건이 충족되었는지 확인합니다.
* **Egress**: 배포가 에어 갭이 될 수 없습니다. ***Release Channel***에 대한 최신 사양을 가져오려면 [deploy.wandb.ai](https://deploy.wandb.ai)에 엑세스해야 합니다.
* **AWS 자격 증명**: AWS 리소스와 상호 작용하도록 구성된 적절한 AWS 자격 증명.
* **Terraform 설치됨**: 시스템에 최신 버전의 Terraform이 설치되어 있어야 합니다.
* **Route53 호스팅 영역**: 애플리케이션이 제공될 도메인에 해당하는 기존 Route53 호스팅 영역.
* **Pre-Operator Terraform 파일**: `pre-operator.tf` 및 `pre-operator.tfvars`와 같은 관련 변수 파일이 올바르게 설정되었는지 확인합니다.
### Pre-Operator 설정
다음 Terraform 코맨드를 실행하여 Pre-Operator 설정에 대한 구성을 초기화하고 적용합니다.
```bash theme={null}
terraform init -upgrade
terraform apply -var-file=./pre-operator.tfvars
```
`pre-operator.tf`는 다음과 유사해야 합니다.
```ini theme={null}
namespace = "operator-upgrade"
domain_name = "sandbox-aws.wandb.ml"
zone_id = "Z032246913CW32RVRY0WU"
subdomain = "operator-upgrade"
wandb_license = "ey..."
wandb_version = "0.51.2"
```
`pre-operator.tf` 구성은 두 개의 모듈을 호출합니다.
```hcl theme={null}
module "wandb_infra" {
source = "wandb/wandb/aws"
version = "1.16.10"
...
}
```
이 모듈은 인프라를 가동합니다.
```hcl theme={null}
module "wandb_app" {
source = "wandb/wandb/kubernetes"
version = "1.12.0"
}
```
이 모듈은 애플리케이션을 배포합니다.
### Post-Operator 설정
`pre-operator.tf`에 `.disabled` 확장명이 있고 `post-operator.tf`가 활성 상태인지 확인합니다.
`post-operator.tfvars`에는 추가 변수가 포함되어 있습니다.
```ini theme={null}
...
# wandb_version = "0.51.2"는 이제 릴리스 채널을 통해 관리되거나 사용자 사양에 설정됩니다.
# 업그레이드에 필요한 운영자 변수:
size = "small"
enable_dummy_dns = true
enable_operator_alb = true
custom_domain_filter = "sandbox-aws.wandb.ml"
```
다음 코맨드를 실행하여 Post-Operator 구성을 초기화하고 적용합니다.
```bash theme={null}
terraform init -upgrade
terraform apply -var-file=./post-operator.tfvars
```
계획 및 적용 단계에서는 다음 리소스를 업데이트합니다.
```yaml theme={null}
actions:
create:
- aws_efs_backup_policy.storage_class
- aws_efs_file_system.storage_class
- aws_efs_mount_target.storage_class["0"]
- aws_efs_mount_target.storage_class["1"]
- aws_eks_addon.efs
- aws_iam_openid_connect_provider.eks
- aws_iam_policy.secrets_manager
- aws_iam_role_policy_attachment.ebs_csi
- aws_iam_role_policy_attachment.eks_efs
- aws_iam_role_policy_attachment.node_secrets_manager
- aws_security_group.storage_class_nfs
- aws_security_group_rule.nfs_ingress
- random_pet.efs
- aws_s3_bucket_acl.file_storage
- aws_s3_bucket_cors_configuration.file_storage
- aws_s3_bucket_ownership_controls.file_storage
- aws_s3_bucket_server_side_encryption_configuration.file_storage
- helm_release.operator
- helm_release.wandb
- aws_cloudwatch_log_group.this[0]
- aws_iam_policy.default
- aws_iam_role.default
- aws_iam_role_policy_attachment.default
- helm_release.external_dns
- aws_default_network_acl.this[0]
- aws_default_route_table.default[0]
- aws_iam_policy.default
- aws_iam_role.default
- aws_iam_role_policy_attachment.default
- helm_release.aws_load_balancer_controller
update_in_place:
- aws_iam_policy.node_IMDSv2
- aws_iam_policy.node_cloudwatch
- aws_iam_policy.node_kms
- aws_iam_policy.node_s3
- aws_iam_policy.node_sqs
- aws_eks_cluster.this[0]
- aws_elasticache_replication_group.default
- aws_rds_cluster.this[0]
- aws_rds_cluster_instance.this["1"]
- aws_default_security_group.this[0]
- aws_subnet.private[0]
- aws_subnet.private[1]
- aws_subnet.public[0]
- aws_subnet.public[1]
- aws_launch_template.workers["primary"]
destroy:
- kubernetes_config_map.config_map
- kubernetes_deployment.wandb
- kubernetes_priority_class.priority
- kubernetes_secret.secret
- kubernetes_service.prometheus
- kubernetes_service.service
- random_id.snapshot_identifier[0]
replace:
- aws_autoscaling_attachment.autoscaling_attachment["primary"]
- aws_route53_record.alb
- aws_eks_node_group.workers["primary"]
```
다음과 같은 내용이 표시됩니다.
 `post-operator.tf`에는 다음과 같은 단일 항목이 있습니다.
```hcl theme={null}
module "wandb_infra" {
source = "wandb/wandb/aws"
version = "4.7.2"
...
}
```
#### post-operator 구성의 변경 사항:
1. **필수 Provider 업데이트**: provider 호환성을 위해 `required_providers.aws.version`을 `3.6`에서 `4.0`으로 변경합니다.
2. **DNS 및 로드 밸런서 구성**: Ingress를 통해 DNS 레코드 및 AWS 로드 밸런서 설정을 관리하려면 `enable_dummy_dns` 및 `enable_operator_alb`를 통합합니다.
3. **라이선스 및 크기 구성**: 새로운 운영 요구 사항에 맞게 `license` 및 `size` 파라미터를 `wandb_infra` 모듈로 직접 전송합니다.
4. **사용자 지정 도메인 처리**: 필요한 경우 `kube-system` 네임스페이스 내에서 외부 DNS pod 로그를 확인하여 DNS 문제를 해결하려면 `custom_domain_filter`를 사용합니다.
5. **Helm Provider 구성**: Kubernetes 리소스를 효과적으로 관리하려면 Helm provider를 활성화하고 구성합니다.
```hcl theme={null}
provider "helm" {
kubernetes {
host = data.aws_eks_cluster.app_cluster.endpoint
cluster_ca_certificate = base64decode(data.aws_eks_cluster.app_cluster.certificate_authority[0].data)
token = data.aws_eks_cluster_auth.app_cluster.token
exec {
api_version = "client.authentication.k8s.io/v1beta1"
args = ["eks", "get-token", "--cluster-name", data.aws_eks_cluster.app_cluster.name]
command = "aws"
}
}
}
```
이 포괄적인 설정을 통해 운영자 모델에서 활성화된 새로운 효율성과 기능을 활용하여 Pre-Operator에서 Post-Operator 구성으로 원활하게 전환할 수 있습니다.
`post-operator.tf`에는 다음과 같은 단일 항목이 있습니다.
```hcl theme={null}
module "wandb_infra" {
source = "wandb/wandb/aws"
version = "4.7.2"
...
}
```
#### post-operator 구성의 변경 사항:
1. **필수 Provider 업데이트**: provider 호환성을 위해 `required_providers.aws.version`을 `3.6`에서 `4.0`으로 변경합니다.
2. **DNS 및 로드 밸런서 구성**: Ingress를 통해 DNS 레코드 및 AWS 로드 밸런서 설정을 관리하려면 `enable_dummy_dns` 및 `enable_operator_alb`를 통합합니다.
3. **라이선스 및 크기 구성**: 새로운 운영 요구 사항에 맞게 `license` 및 `size` 파라미터를 `wandb_infra` 모듈로 직접 전송합니다.
4. **사용자 지정 도메인 처리**: 필요한 경우 `kube-system` 네임스페이스 내에서 외부 DNS pod 로그를 확인하여 DNS 문제를 해결하려면 `custom_domain_filter`를 사용합니다.
5. **Helm Provider 구성**: Kubernetes 리소스를 효과적으로 관리하려면 Helm provider를 활성화하고 구성합니다.
```hcl theme={null}
provider "helm" {
kubernetes {
host = data.aws_eks_cluster.app_cluster.endpoint
cluster_ca_certificate = base64decode(data.aws_eks_cluster.app_cluster.certificate_authority[0].data)
token = data.aws_eks_cluster_auth.app_cluster.token
exec {
api_version = "client.authentication.k8s.io/v1beta1"
args = ["eks", "get-token", "--cluster-name", data.aws_eks_cluster.app_cluster.name]
command = "aws"
}
}
}
```
이 포괄적인 설정을 통해 운영자 모델에서 활성화된 새로운 효율성과 기능을 활용하여 Pre-Operator에서 Post-Operator 구성으로 원활하게 전환할 수 있습니다.